Man.
Man oh man.
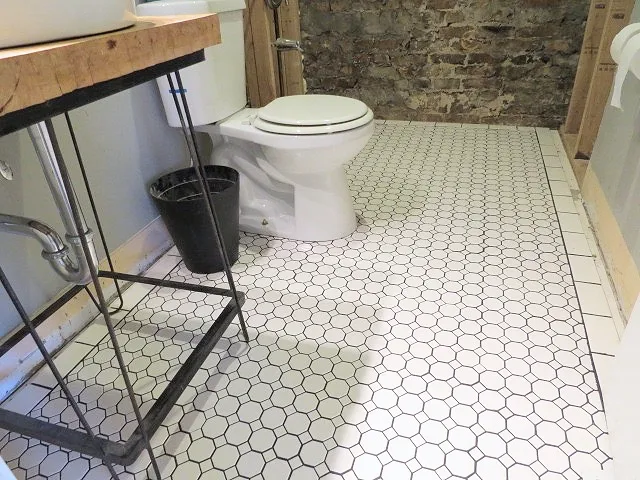
Ok! All righty! Yes folks, the tile is done. Can you believe it? Yeah, neither can I. Yay!!
 |
| Oh! Oh! Could it be?! NEW tile?!?! |
 |
| Staged for sale before photo. O.M.G. I cannot believe we bought this house sometimes. |
We have NEW tile. And I did it myself.
Surely ha ha you realize by me doing it myself, it is not perfect. But hey, it's close. And the imperfections, well, they uh, sure, give the floor personality. Maybe? I hope that's what future home buyers of this joint will be thinking...... (sorry Pete.) (No Pete it isn't as terrible as I make it sound.) (Ask Mike. It's surprisingly decent.) (Back peddle, back peddle....)
Here's the reason why I went for a mosaic type tile in the first place: I thought it'd be easier. Ha! Right. Nope. Was I way wrong. Wow. Bzzzzt, wrong. Or at least not in this scenario with all the tricky maneuvering that needed to happen.
I thought it'd be easier to get around the toilet hole and the floor vent than trying to cut bigger solid tiles. Ya know, just pop out little bits. Turns out using this type of tile to get around floor holes, whatev's man, made not much of a difference here really. Well, ok, it did help with the toilet hole but not the vent so we're 50/50 on that.
I mean, it's utterly wacky thinking because as it turns out, the cutting of the tiles was the easiest part. Whaaa?! I know, I should be locked up in a padded room now.
Oh hey, handy tip? Trace your toilet on the floor before you stick down your tile, that way you know where everything is.
 |
| Ah see, bein' smart! |
Oh hey, another handy tip? If you're removing your vanity or sink set up or whatever and can't tell which water line is which into the faucet or you know you'll forget? Tack on labels. Bingo, easy peasy lemon squeezy.
 |
| Be clever. Label. |
See, I left a gap between the tile and the wall for the baseboard so that as much of the 3x6 tile would be exposed when the quarter round went on. Had I not left a gap, pushed the 3 x 6 to the wall and set the trim on top of the tile...well, I thought it would look mighty strange. And negate the point of having the 3x6 border.
I'm not sure how I'm going to resolve that. I'm really not sure. Measured twice million times, cut once and can't figure out how, like, hm, like how the whole floor seemed to have shifted south a quarter inch despite following my lines.
Yeah, so that's a dilemma. I mean, it's close. I suppose I could get more border tiles and cut those and drop them in, put the baseboard on top of that then the quarter round. Or maybe caulk will be my new BFF.
More thought required.
Had to start the mortaring from where the new floor meets the kitchen as the new floor had to be flush and level to the existing. That was fun. Cough. Because, uh huh, the old bathroom tile (and kitchen tile) and the new bathroom tile are different thicknesses. Had more of a gap to fill, ya see. Heh.
 |
| Oh yes. Me and my arch enemy mortar. Duking it out right away. |
So I went from the kitchen straight back, then across. Then across down back towards the door. Yeah, try not to ever tile yourself into a corner. I've painted myself into one and that's rough enough.
Like always, I started this project component too late in the day, i.e. 5 p.m., thinking I could get it all down and in but nope, I had to stop a few hours in.
 |
| And it began. So did the swearing and questioning of my mental soundness. This is when I had to stop for the night. |
 |
| Gettin' there. |
I royally hosed the grout. Ha, a pun, hosed. You'll see....
Here's the thing about grout n' me, us two. I perpetually do it wrong. I splop it on, schmear it 'round, scoop up as much as I can, wait a minute or two, panic at the mayhem then start sponging.
Yep, I know. Wrong.
Plus, wiping too soon henceforth and therefore...why I eternally end up with a huge gigantic huge mess.
 |
| ACK!! |
 |
| Started wrong, tried to do it right by this point. |
So I got antsy and plugged in a fan to try and speed things up.
See, here too to be really honest, I was frayed by not having a functioning toilet on the first floor after three days. One of my main absolute rock bottom requirements for the home we were buying was to have a potty on the main floor. That was zero nonnegotiable.
I got tired of waiting.
 |
| Not done cleaning grout, didn't care -- toilet went back in dammit. |
Once the grout dried, the color was uneven. Light gray in some spots, near black in others.
Too much water affects the color. Did not know that. Arrrggg, rats!! Bonehead move. Major bonehead, kick myself, sheesh.
 |
| Finn pointing out my lack of dark grouting skills. |
So do not do what I do. Instead, read the directions on the grout package and follow them and try not to freak. Because now I am spending two hours here, two hours there touching up every single line of grout by hand with a small paint brush and grout colorant.*
Yes, crawling around the bathroom floor, every single darn line. Tiny paint brush. Re-coloring the grout. Every.damn.line. Can't feel my legs.
Boy, did I learn my grout lesson all right. Whooie.
 |
| Mmm hm. Yep. |
But the tile is in! Major major accomplishment. And as soon as I recover from the whole thing, I will rejoice.
 |
| It's in! It's done! Done done done done done done done!!! |
Seriously, I walk in there and "OH!" pops in my head every time.
And now I am way pooped. Way pooped.
 |
| Yeah, figures, that last to be laid seam is in the most obvious spot that will drive me crazy forever. |
- Craigslist tile, thirty square feet, $25
- Additional fourteen sheets of tile,* $36 (Ack!! Nutso, right?!)
- 31 or so 3x6 border tiles, $23
- Unsanded grout, $2 (Habitat ReStore, thank you!)
- Mortar, leftover from backsplash
- Colorant/sealer, $12 (boo, grrrrr....blew the whole savings on the grout)
Where am I at with en toto expenditures on this bathroom redo? Including the vanity I built, we're at $376.50. Well, unless you subtract out what I sold the original vanity for then we're at $151.50. Not bad. Either way not too bad for an entirely different look already.
 |
| It's finished. Holy cow, wow!! |
Later this week I'm working on Patriot* for three days so I'll be a bit short on projects for ya. But hey, no need to panic. It's just three days!
*The link for Patriot is an Amazon affiliate link though episode 1 is free. The colorant/sealer is an Amazon affiliate link as well. Oh and the octagon dot tile is a Home Depot affiliate link too. Mwah, thanks! Please see the "boring stuff" tab for more info.


I’ve been browsing online more than three hours today, yet I never found any interesting article like yours. It’s pretty worth enough for me.
ReplyDeleteIn my view, if all webmasters and bloggers made good content as you did, the
net will be much more useful than ever before.
pavetile