

It's one of a kind, it's unique, and it came out better than I envisioned. I'll pepper in links to previous posts about the whole big long process which in some cases elaborates further on the steps. In searching for older pantry floor posts, the list is lengthy and I see my first inklings began in early April. I will admit, it's very painful rereading some of those older posts.
Back in May, I ripped out the cheapy crappy terrible carpet. So then here's what I used for the new floor:
- pieces of various types of pre-cut 1x wood, free from a pallet rehabber (Twitchy, for those who've been following along)
- floor underlayment
- sawdust
- Minwax High Build polyurethane, semi-gloss
Total cost: approximately $90.00
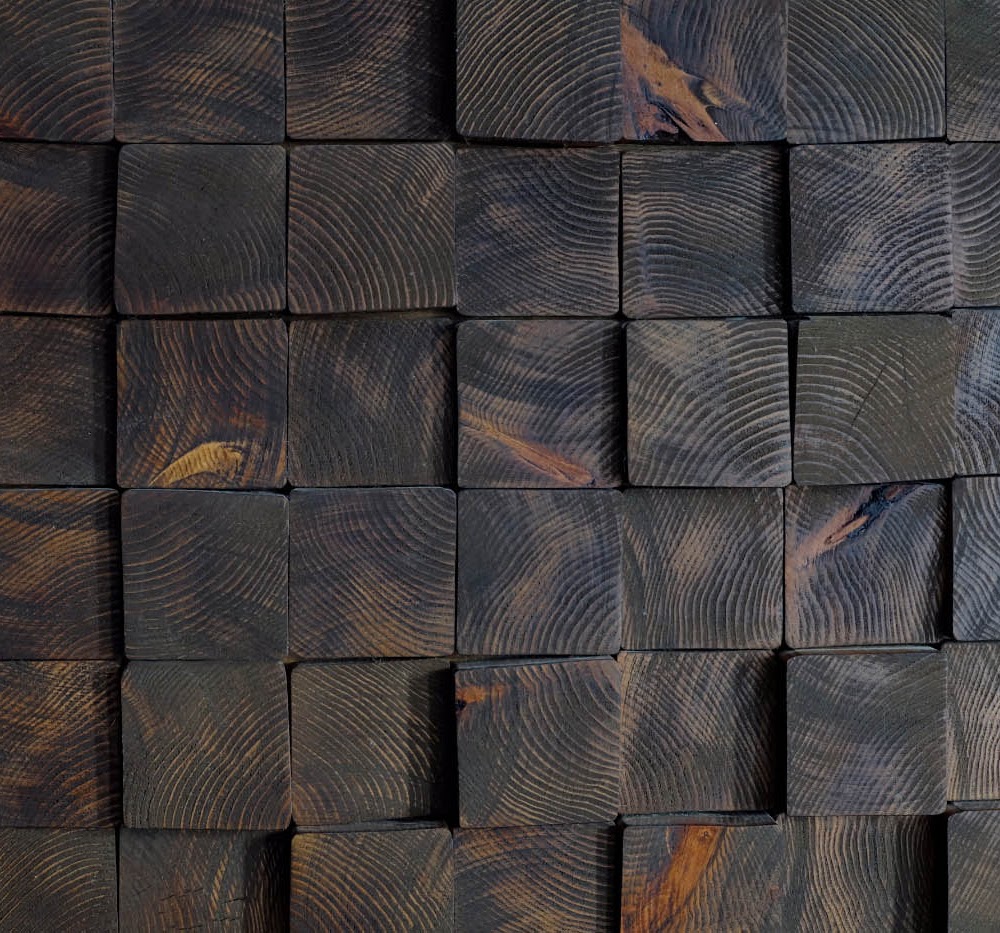
I began by collecting the individual cut pieces from Twitchy. Each time I collected a batch, I would arrange them on the floor which also allowed me to track my progress on how many more pieces I needed. Shortly after the wood collection began, I painted one of the walls in that happy happy Lemon Curd color, my now favorite yellow.

 |
| There's that Lemon Curd. Pretty, isn't it? |


I had also been collecting thinner more slat-like pieces of wood and arranged them on the face and step.

 |
| Still some tidbits need attending to here, but close to done is good. |
Next up, time for floor underlayment. The original floor under the cheap ratty un-vacuum-able carpet was a mix of OSB and old old floor boards that appeared as though they were part of a porch of some sort.

And with this flipper, who knows what the deal was. But because the floor would vary in temperature more than one would anticipate throughout the seasons, mainly because there's a ginormous gaping vacuous area open below the floor, a layer of insulation was the right thing to do.

I measured out a piece, trimmed it easily with scissors, then stacked a portion of the wood pieces in reverse order in small piles. Stuck that underlayment down, re-lay out the wood and it was onto the next section. Once everything was good to go, it was nail time! I tacked it all down with a nail gun, courtesy of my excellent woodworking friend Scott.

And with this flipper, who knows what the deal was. But because the floor would vary in temperature more than one would anticipate throughout the seasons, mainly because there's a ginormous gaping vacuous area open below the floor, a layer of insulation was the right thing to do.


Mixed with mineral spirits as a thinner and the polyurethane, I had my "grout." It was a complicated and messy venture, certainly slow going.

Not hard to do, mind you, just interminable if you're a perfectionist like me. It required patience and perseverance, mainly I think because the spacings varied wildly and the wood pieces are not of equal thickness. Eventually (5+ hours later eventually), it was filled in and dried overnight.

Not hard to do, mind you, just interminable if you're a perfectionist like me. It required patience and perseverance, mainly I think because the spacings varied wildly and the wood pieces are not of equal thickness. Eventually (5+ hours later eventually), it was filled in and dried overnight.

The next day was ugly. I thought I had been tidy but clearly, ugh, I had not been. Sigh.

There were dried crunchy chunky messy bunches stuck all over the wood. Aw man, I was disappointed. And panicked.

After scraping and scraping and scraping which could have gone on forever, I had to just stop and seal the floor with the poly. I was nervous. Whooie, way nervous. What if the poly didn't hide the scrapey mess?! What if all my hard work was for naught, ruined in one fell swoop of sawdust grout mess?!?!
Using a paint pad, I applied the poly by hand so I could flood smaller gaps, minimize bubbles, and closely control the poly. I closed my eyes, ran the first swipe and whewwwwww, the mess was erased. Yesss. What a relief!!
 |
| Half on, half off. |


So what does this mean for my blog? I'm not sure yet what direction this will go for the next four-ish months, so I hope you'll continue to hang with me until December here and there until I'm fully back at my list, refreshed bank account and raring to go. Thanks very much for everything, everybody and hopefully I'll be seeing you back here right soon!
Happy birthday to my dad today. And today would also have been Hailey's 12th birthday. She is so missed.


I love this floor like whoa. And totally agree with Mike--your greatest accomplishment in the house! It's a work of art.
ReplyDeleteThank you! xoxo
ReplyDeleteWhat a unique floor! I love it :) Awesome job.
ReplyDeleteThanks so much Breanna!
ReplyDeleteoh wow- what a unique idea! It came out great!!
ReplyDeleteOh my gosh.... I want that on a WALL. It's fabulous!
ReplyDeleteThank you both, ladies! It's definitely something you could do on a wall too!
ReplyDeleteThat is the most interesting floor I have ever seen!!! I love it! Wow girl, you rock!
ReplyDeleteOh this is so pretty! And very unique - love it!
ReplyDeleteI love it! Way to think outside the box!
ReplyDeleteThanks for the nice compliments, ladies!
ReplyDeletewow, very unique floor! The pantry looks huge!
ReplyDeleteThank you very much!
ReplyDeleteThat is gorgeous. Looks so old worldy and rustic.
ReplyDeleteI absolutely LOVE this! This will be happening to my mudroom floor!!
ReplyDeleteThanks! Do share those mudroom photos when you're done!
ReplyDeleteI'm going to hire you to redo my apartment when I strike it rich. :)
ReplyDeleteAnd I will be there in a flash to do it, too!
ReplyDeleteJust wow! :)
ReplyDeleteThank you Saraccino!
ReplyDeleteAwesome Job
ReplyDeleteThank you Babsie!
ReplyDeleteDid you put the grout all over the floor, or keep it in the cracks? What did you apply it with?
ReplyDeleteI tried to keep it confined to the gaps between the wood. I used a plastic putty knife, a paint mixing stick and my hands, so it was quite a process. I have a post discussing it here, if you're interested: http://humboldtartdept.blogspot.com/2014/07/grouting-pantry-floor.html
ReplyDeletewow!!! nice floor. what was the basic bottom floor concrete or wood? I would love to do this...
ReplyDeleteThanks Donna! The floor was a mix between porch floor boards and OSB, so a weird base. You can read about it here: http://humboldtartdept.blogspot.com/2014/05/aaand-back-to-pantry-floor.html
ReplyDeleteCould you could you use a sander to get the extra grout and make the wood(floor) even? Instead of doing it by hand??
ReplyDeleteI opted not to use a sander as I wanted to keep the aged, weathered patina intact on the wood pieces. The floor isn't as uneven as it might appear in the photos. It's a tough room to photograph! The parts that are a bit more uneven don't bother us. Certainly a floor sander could be used.
ReplyDeleteBecky, Just found your blog and love it! As I was reading posts, I fell totally in like with you, Mike and Hailey. I am so sorry for your loss. When I lost my Gus, I couldn't function. I am sending hugs to both of you. For your floor which is amazing btw...have you thought of using epoxy for the remaining top coats? That would really get into the remaining gaps and crevices. Not to mention the amazing finish.
ReplyDeleteOh thank you so very much! I'm touched! It's the worst thing in the world, losing a fur baby. I'm so sorry for your loss. About the floor, funny you should mention the epoxy - I have given that some serious thought and think it would look excellent. It was the cost, quite honestly, that was holding me back. Thanks so much for reading along!!
ReplyDeleteI have done walls but the thought of doing floors has crossed my mental jungle a few times. We are in the process of tearing up the carpet to stain the concrete. Maybe pallet wood on the hall floor. Thanks for the idea.
ReplyDeleteYou're very welcome! I love concrete and stained concrete floors. Sounds like your place will have some darn cool floors when done!
ReplyDeleteAre your floors shrinking/separating yet (Winter)? Buckling? (Summer) You should have left a 1/4" gap around the perimeter for expansion and contraction. Looks good though!
ReplyDeleteNope, the floor hasn't changed at all and I'm in there daily, several times a day. The room is not heated very well and tends to stay cooler throughout the year so we haven't had any problems. There is a gap around most of the perimeter filled with the "grout." Thanks for the helpful tip!
DeleteSo unique and it looks great. and the price aint to shabby either...my kinda project!
ReplyDeleteThanks so much!
DeleteGreat floor - what an amazing idea!
ReplyDeleteThank you!
DeleteI can't think of anything worse than carpet of ANY type. I'd take this instead, hands down. Plus I love the rustic cowboy-cabin look to it.
ReplyDeleteI'm not a carpet fan either, yick. Thank so much!
DeleteI am not a carpet fan either. Pulling up the once cream carpet in our new house we found such ugly stains & terrible pad. Painted a terra cotta the cement until we can get all our wood for the floor. Loved all your sharing, it helps me plan my venture.
DeleteOne of the major reasons why I despise carpet -- you never know what lurks beneath. So glad you found this helpful! Thanks so much!
DeleteThanks for sharing this. I walked past an industrial premises the other day (I never go past there, but my car broke down, and that was the route by bus) where there were huge piles of pallets. I'm excited by your idea to go ask them for a load of free pallets to prepare for the floors of my house. Thanks for the inspiration.
ReplyDeleteI'm so sorry your car broke down but I'm glad you found inspiration in our floor and, fingers crossed, some free pallets! I hope it all works out fantastically for you! Thanks for taking the time to read and comment!
DeleteEverything happens for a reason! Glad you made lemonade.
DeleteThis is a **fantastic** job, congratulations!!
ReplyDeleteNow, here in the south wooden floors are not so common (I mean, the floor against which you nailed the pallet wood). We use mostly concrete. What would you suggest to fix the parts against concrete, then?
Thanks so much! You'd likely have to lay down a type of plywood subfloor over the concrete and attach the pallet pieces to the subfloor. Or so I saw suggested on a quick search of the topic.
DeleteHi i was just wondering how the floor has held up, particularly the grouting?
ReplyDeleteThanks so much for asking! It's held up amazingly well. The grout has held up quite well too though in a couple spots it fell in, likely because I didn't get those spots completely filled the first time. It's all in there still, nothing has come out. In retrospect, I should have chosen a more clear poly as the one I picked has yellowed a tad but overall, the floor is great. We're thrilled with it and love it. Thanks!
DeleteWow, this is a lovely work of art. I would love to steal this idea some day!
ReplyDeleteThank you so very much and I hope you do get a chance to steal the idea someday,
DeleteWow! This is amazing!! Your hard work definitely paid off! Such a unique and cool floor. Pinned this!
ReplyDeleteI never got notice of your very nice comment, darn it! Thanks so much!
DeleteI did this with pallets, but I used countersunk screws and then pegged the floor with dowels. I did another one with cedar scraps from bible boxes-took 2 truck loads full-but I glued them down. Both were beautiful floors.
ReplyDeleteWow, sounds like not only were they fantastic floors but you spent a great deal of time working on them! Nice job!
DeleteWow, you are industrious! Wish we could see pics!
DeleteLove this flooring ! You did a fantastic job.
ReplyDeleteThank you so much!
DeleteI love all the color variations of the wood you chose. Most polyurethane yellows on wood, so don't beat yourself up on that. Sand and epoxy if funds allow, if not, it only adds to the charm. Thank you for the very detailed post, enjoyed it immensely!
ReplyDeleteThank you! Yeah, I had forgotten about the yellowing given my state of mind at the time. Maybe someday I'll sand it but I'd hate to lose the variations in the wood. Thanks so much!
DeleteFirst time on your blog and I’m really loving this floor! I wanted to do that type of thing in my home but with much bigger wood but my husband was a …well he wouldn’t let me do it. I can assure you, when this laminate crap gets ruined I will have my wood floor..lol!
ReplyDeleteWelcome and thank you so very much! Sorry your husband was a stick in the mud. Get some of those big pieces ready on standby to show him all he’s missing! Good luck and thanks again!
DeleteLove this! So creative! I never would have thought of this. If I didn't already have all of my floors done I would have done it in a small.room too. Plan to keep this in mind for future projects! New at reading your blogs but have enjoyed the ones I have read.
ReplyDeleteThank you very much! I’m thrilled you’ll keep this in mind! And thanks for checking out other posts, so glad you’re here!
Delete