 |
| Still deciding on a paint color for the stairway. Still. Still...... |
But, Mike's idea was five-star and I wasn't about to let it vanish into the ether.
So I did a little research. And guess what I found: Westinghouse Recessed Can Converter Kit*
Suh-weeeet! It was inexpensive enough-ish so I ordered it up and this past weekend I finally got the project done. And generally speaking, it was pretty easy to put in and took less than a half hour. I wasn't timing it though, sorry.
Again, not big with reading directions but I figured I should, especially after the lessons I learned while installing the thermostat.
So I went step by step. My brain either doesn't work well in the Directions Reading Department and therefore it seemed a tad confusing (thankfully they had images too) or the directions were indeed a smidge confusing. Either way, they left some things out which, guess what? I will share with you! Yay!
First and foremost, shut off that electricity at the ol' breaker box. And put your protective eyewear on.
Next up, screw in the socket piece. Easy peasy, twisty twisty.
Third, install the first bracket into the recessed can, the one on the left below.
First thing they left off the instructions: remove the trim cover piece. I suppose that's a big "duh" but when you fully surrender to the directions and it's not on there, yeah. Anyway, I felt less than bright. Ah ha, a silly pun!
I made an error here but discovered it further into the project, only because it wasn't explained in the directions. That's right, that's what I did, I blamed the directions.
That bar with the holes where the screw is in the center? Yeah, didn't know that bar slides and you need to put that screw in the center hole. Ok wait, so slide the middle holey bar so it's centered then attach the screw.
Fourth, make sure your helper assistant is close at hand to catch all the screws you're dropping.
 |
| "If I had opposable thumbs, I'd be even more helper! Got the door covered though, Mommy." |
Time to attach the second bracket part and where I discovered that the bar in the middle with the holes has to be centered.
Hopefully now you can see why the middle sliding bar needs to be centered.
Figure 6 here is telling me to attach the green ground wire to the side of the recessed can. Not really the best illustration as it's kinda showing attach it in two different places?, or it's just not clear?, so I attached it to the metal tab inside the can.
The next part is where you whip out your schmancy new pendant fixture.
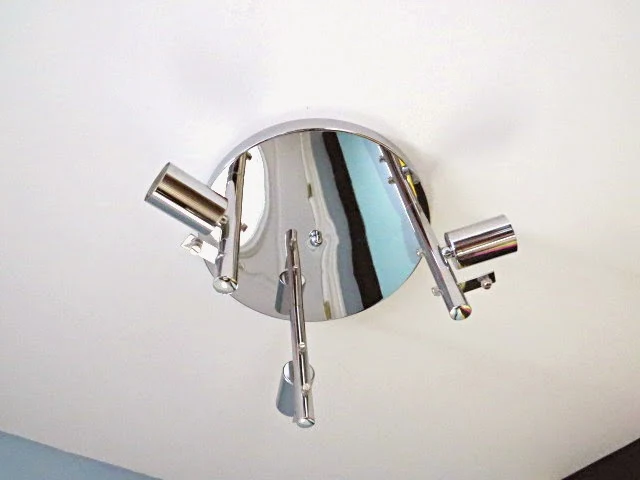
Of course, me, I shopped forever and forever and forever, finally choosing one on eBay*. I emailed several fixtures to Mike for him to select from. I wasn't sold on any of them really but the one he chose did fit all of the criteria I was searching for: tighter to the ceiling, spread out horizontally, circular in design. I'll show you the fixture here in a moment.
Find the ceiling bracket in the packaging of your new pendant and attach it to the last bracket you installed.
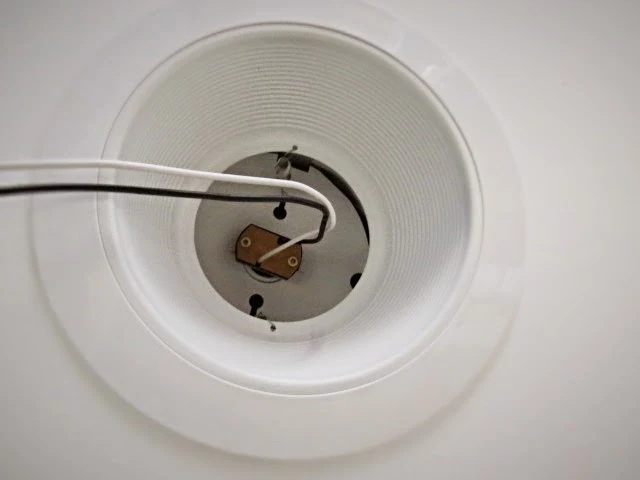
I ran into trouble here as the screws that came with the fixture were lengthy and there was this other little green ground screw in the second bracket that the fixture screw ran into. I tried to loosen the green screw but it wouldn't budge so I used a shorter screw. No real clear idea what that screw and exposed wire is for; there was no mention and I had just attached a ground wire.
 |
| No idea how I managed this photo while atop a ladder but it shows exactly what the issue was. |
Anyway, I had gotten the disk on but it gave me fits trying to get it off and I sliced my finger. Yeowchie. Bandage and Swearing Time Out.
 |
| Mean finger slicing metal disk. Be careful! :) |
So ok! The recessed can kit is in! Generally pretty easy, right?
Time to install pendant light fixture. Of course your experience will vary here.
Attach the base of the fixture to the fixture bracket.
Then attach your fixture.
The fixture itself I can't say is my favorite-to-die-for-gotta-have-it but it was one of those things where I thought ok, it meets my criteria and maybe possibly could-be it will look better and appropriate once it's up.
Mike saw it and said, "OOHh!"
Hm.
So I asked, do you like it? And he said, "do you?" When he asks that immediately in return I know he's not reaaalllyy digging it and he's trying not to hurt my design feelings.
Part of it, I think, is that we're not used to a larger fixture here. Part of it is that it makes me dislike the front door even more, if that was possible. Two completely different incongruous styles. Part of it could be that the foyer area stands out as more incomplete now. And lastly, part of it could be that it's just not the right fixture. I bet it's a combo of all four, heavier on the latter.
Maybe circular was the wrong way to go. It's ok to make mistakes and admit them. It's actually very important to make mistakes. So maybe the search continues. Maybe more sparkly. Now the gears are turning and I make my own DIY foyer light fixture. Ahhhh, here we go, down the rabbit hole....! Poor Mike.
We'll see. Mike suggested a dimmer which is a great idea. I could only find 60w fluorescent bulbs in the house and they're way too much.
So yeah, we shall see. But that kit? Very clever and a mighty good idea. Glad I found it and glad I could share it with you.
What's on tap for the week around here? Not quite sure yet, but stay tuned!
*The recessed can converter kit link is an Amazon affiliate link. The eBay link is an eBay affiliate link. Mwah, thanks!


Thanks so much Bryan! Mike has great ideas, a great design sense, plus this is his house too so it's important to me that he's happy in it as well. I was excited indeed! Thank you!
ReplyDeleteMy husband worries when he sees "do it yourself" electrical projects on the internet. He is an instructor for the electrical shop at a vocational technical school. If you want to save money, maybe wait and use an electrician to do all the smaller electrical projects at one time. You can also save money buying your own fixtures. (I hope the new fixture isn’t heavier than the first one.) Please, be careful with a dimmer, not all of the newer light bulbs are made to be dimmed. Mistakes cost much more in the end. If you have a newer constructed house you could be fine, but, please be safe, at least ask an electrician if it meets code for your state, you could probably just show him the pictures. Oh, and your helper…. Sleeping on the job… you’ll have to deduct that from his/her snacks. Good luck.
ReplyDeleteHe has every right to be concerned, there is a lot of bad or incomplete information to be found on the internet that could result in a disaster. When it comes to electricity, it’s imperative to know what you’re doing or hire a professional, both of which I advocate strongly for. It’s not cool to make a mistake and burn your house down in an effort to save a few dollars.
DeleteYeah, that helper, he needs some retraining for sure! Haha!
Thanks for your input.